Team Configuration
How to set up and distribute a shared configuration across your team using a hosted URL.
Team Configuration
Team Configuration allows administrators to export a single configuration file and share it with their entire team via a URL. Once connected, each user's extension automatically applies the shared settings — including Quick Searches, Response Repository entries, Context AI prompts, Note Clipper targets, and Autolinker rules.
No backend or IT setup is required. The config auto-refreshes every 4 hours.
Admin Workflow
Step 1 — Configure the Extension
Set up the extension as you want it to appear for your team. This includes Quick Searches, Response Repository entries, AI prompts, Note Clipper targets, and Autolinker rules.
Step 2 — Export the Team Config
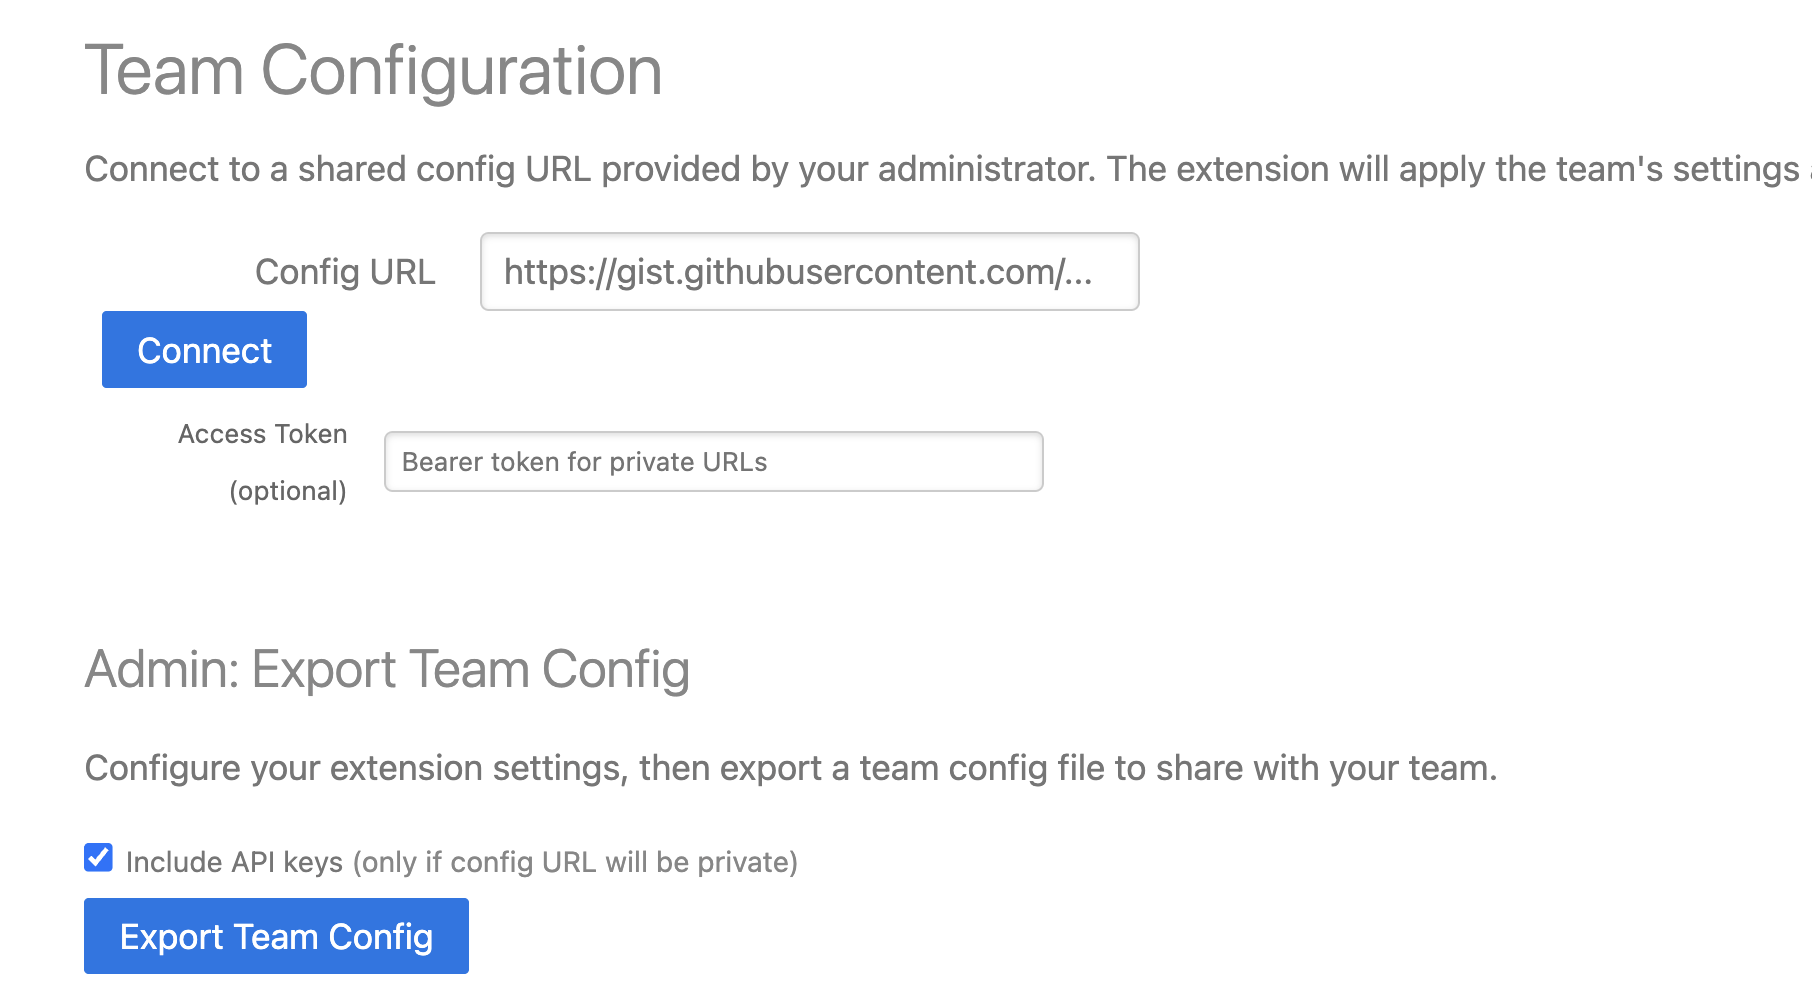
Open the extension and go to Options.
On the Home tab, scroll down to the Team Configuration section.
Include API Keys (optional): Check the "Include API keys" checkbox before exporting if you want your team to use a shared API key for Context AI. Only do this if your config URL will be private and access-controlled.
Click Export Team Config.
A file named team-config.json will download to your computer.
Step 3 — Host the Config File
Choose a hosting option based on your team's size and security requirements.
Option A — GitHub Gist (Unlisted)
Best for: small teams, non-sensitive configs (no API keys, no internal-only URLs).
1. Go to https://gist.github.com and sign in.
2. Click + to create a new Gist.
3. Set the filename to team-config.json.
4. Paste the contents of your exported file into the editor.
5. Click Create secret Gist.
6. Once created, click the Raw button in the top-right of the file.
7. Copy the URL from your browser's address bar — it should begin with https://gist.githubusercontent.com/.
▎ Important: Do not use the Gist page URL (gist.github.com). Always click Raw to get the direct file URL.
▎ Keeping the URL stable: When you update your Gist, always edit the existing file rather than deleting and recreating it. Use the SHA-less Raw URL format: https://gist.githubusercontent.com/{username}/{gist-id}/raw/{filename}.json
— this always points to the latest version. If your URL contains a long alphanumeric string between /raw/ and the filename, remove that segment.
No Access Token is needed for this option.
Option B — Private GitHub Repository + Personal Access Token
Best for: mid-size teams that want access control without managing internal infrastructure.
Admin — Generate a Personal Access Token (PAT):
1. Log into GitHub on the account that owns the private repository.
2. Go to Settings → Developer Settings → Personal Access Tokens → Fine-grained tokens.
3. Click Generate new token and configure:
- Name: CME Team Config
- Expiration: Choose based on your rotation policy (90 days recommended)
- Repository access: Select the specific config repo only
- Permissions → Contents: Read-only
4. Click Generate token and copy it immediately — GitHub only shows it once.
5. If your organization uses SAML SSO (e.g., Okta): Find the token in your token list, click Configure SSO, then click Authorize next to your organization name. This step is required — without it the token will be rejected even with correct permissions.
6. Distribute the token to team members via a secure channel (company password manager, 1Password, secrets vault, etc.).
The raw file URL format: https://raw.githubusercontent.com/{username}/{repo}/{branch}/team-config.json
Operational notes:
- When the token expires, all users' auto-refresh will silently fail. Regenerate the token, re-authorize for SSO if needed, and redistribute before expiration.
- Fine-grained PATs scoped to one repo with read-only access limit exposure if the token is ever leaked.
Option C — Internal Intranet URL (Recommended for Enterprise)
Best for: large enterprises, configs containing internal tool URLs or API keys, organizations requiring that config data never leave the corporate network.
Host the team-config.json file on any internal web server — an intranet site, SharePoint, or internal file server accessible over the company network or VPN. Example: https://intranet.yourcompany.com/cme/team-config.json
Any user on the corporate network or VPN can reach this URL. No token is needed in the extension. The config is invisible to anyone outside the network. Coordinate with your IT team to serve the file with the following HTTP header to allow the extension to read it:
Access-Control-Allow-Origin: *
No Access Token is needed for this option.
Step 4 — Share the URL
Send team members:
- The raw config URL
- The Access Token (only for Option B)
Lock Behavior
Admins can lock individual products in the exported config. Locking controls what users can and cannot modify.
Lock Behavior
Quick Search: Only managed searches appear in the menu. Users cannot add personal searches.
Response Repo: Only managed responses appear. Users cannot add personal responses.
Context AI: Provider and API key are locked. Users can still add their own prompts using the org's API key.
Note Clipper: Only managed targets appear. Users cannot add personal targets.
Autolinker: Only managed rules are applied. Users cannot add personal rules.
When a product is locked, a notice appears at the top of that product's settings tab indicating it is managed by your administrator. When lock is set to false, managed items appear first in the menu followed by the user's personal items.
Updating the Team Config
1. Make changes to the extension settings on your admin machine.
2. Export a new team-config.json.
3. Replace the file contents at your hosting location (edit the existing Gist, update the intranet file, or commit to the repo).
4. Team members' extensions will pick up the change automatically within 4 hours, or immediately when they click Refresh Now.
User Workflow
Connecting to a Team Config
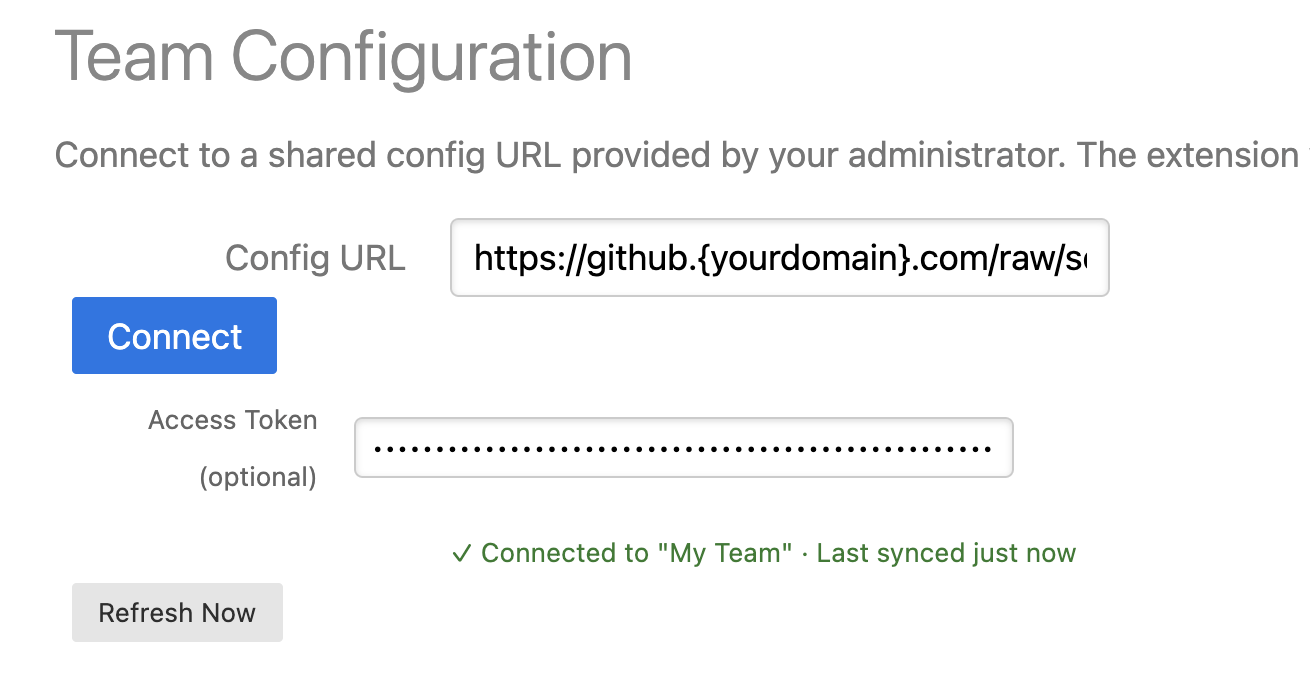
Open the extension and go to Options.
On the Home tab, scroll to the Team Configuration section.
Paste the URL provided by your admin into the Config URL field.
Click Connect.
The extension will fetch the config and rebuild the context menu. You will see a confirmation message with the org name and last sync time.
The config automatically refreshes every 4 hours. You can also click Refresh Now at any time to pull the latest version.
Disconnecting
To remove a team config:
Open Options → Home → Team Configuration.
Clear the Config URL field.
Click Connect.
Managed items will be removed from the context menu and all product tabs will return to personal configuration mode.
Troubleshooting
"Failed to fetch" or 401 error
- Confirm the URL begins with the correct domain for your hosting option
- For GitHub Gist: ensure you clicked Raw to get the direct file URL, not the Gist page URL
- For private GitHub repo: confirm the PAT has not expired and was authorized for SSO if your org uses Okta
- For intranet URLs: confirm you are connected to the corporate network or VPN, and that the server includes the Access-Control-Allow-Origin: * header
"URL did not return valid JSON" error
- You are likely using the Gist page URL instead of the Raw URL
Config not updating after changes
- For GitHub Gist: confirm you edited the existing file and are using the SHA-less URL format (no alphanumeric segment between /raw/ and the filename)
- For private repo: confirm you committed and pushed the updated file
- Click Refresh Now to force an immediate sync
Managed items not appearing after connecting
- Reload the extension from chrome://extensions and reconnect